


Game version 1.2.0
Contents
- Quick start
- Modes
- Interface
- Survivors
- Relationships
- Orders
- Moving
- Idle activities
- Resting
- Events
- Locations
- Items
- Combat
- Strategy guide
- Customising your game
- Editing your diary
- Publishing your diary
Quick start
Step 1
Start a game of Road Kill. You should see a diary and some introductory text. Click the map on the right of the diary. This will take you to the Planning view.
Before you make your first move, examine your survivors. You can right-click on the survivor portraits to get an overview of your survivors and their occupations. To get more detailed information, click on a portrait or press ‘S’.
A survivor’s former occupation will give you some hints about their attributes and motivations. Check the bio to see if a survivor excels at a specific order.
Look at the relationship diagram and pay attention to any relationships with a solid line – these relationships will generally be stronger because neither survivor is harbouring any particular prejudice against the other. Take note of any strategic pairings (eg, an engineer and a carpenter, or a police officer and an athlete). You might be lucky enough to have a solid triplet of survivors.
Step 2
Go back to the map and look at where you are and what’s nearby. Pick one or two houses nearby to search. Remember to think about your survivors and their relationships – are there two obvious groups? Maybe one survivor who isn’t getting along with anyone?
Step 3
Drag your survivor tokens to their destinations. By default your survivors will just investigate and return, so click the blue highlighted text to go to the movement screen.
Step 4
Select ‘Breach’. Later in the game you might want to investigate or assault a location, but there are few zombies around at the start of the game, and unlike special locations, houses don’t have many zombies inside.
Step 5
If you have some weapons around, click on them while on the movement screen to order your survivors to take them. Remember that many items can be used as weapons – even a frying pan is better than nothing.
Step 6
Return to the map screen and select your starting location. It’s a good idea to keep a survivor or two around. Until you have all the rescue clues, your priority should always be searching so order at least one survivor to search the location. While it’s quiet, consider preparing some meals.
Step 7
Go back to the diary and click the watch. Hopefully, your survivors successfully breached a nearby house, you prepared at least one small meal, and you turned up some interesting items at a location.
Step 8
Continue searching the locations. If the locations are close, set a survivor to watch for zombies – this will reveal zombies nearby, and also give you some bonuses if zombies attack a location.
Step 9
Designate one of the houses you’ve investigated to be a temporary safehouse. This will be a convenient, secure and defensible location that your survivors can bring their supplies back to. Good candidates for safehouses will have few entrances and will be located toward the centre of town.
Once you’ve decided on your temporary safehouse, order your best barricading survivors to quickly barricade the location. Get any survivors in neighbouring locations to return with any useful items.
Step 10
Consider staying here for a full day. Depending on your survivor talents, start making preparations for the following day. Modify weapons, prepare meals, patrol locations. If your survivors aren’t getting along, start a rumour or two and try and build some positive relationships.
By the second day, you should have a fairly secure location to spend the night, a mostly harmonious group of survivors, one or two weapons, some medical supplies, and enough food to last a day or two.
Now plan a route through the town. Which houses will you search next? Should you try and take a special location? Should you split the group or line up some rumours? There are many paths to survival – and many more to failure – so think carefully.
Difficulty
Zafehouse: Diaries is a difficult game – don’t expect to win straight away. It may look simple, but there’s a lot of complex interactions going on under the surface, which may not be apparent when you first start playing.
But stick with it. While there’s a lot of randomness in the game, it’s not as random as it appears. Think of it like hedging your bets: focus on your relationships, put the right people on the right orders, keep an eye out for hints in the diary, and don’t get cocky.
Modes
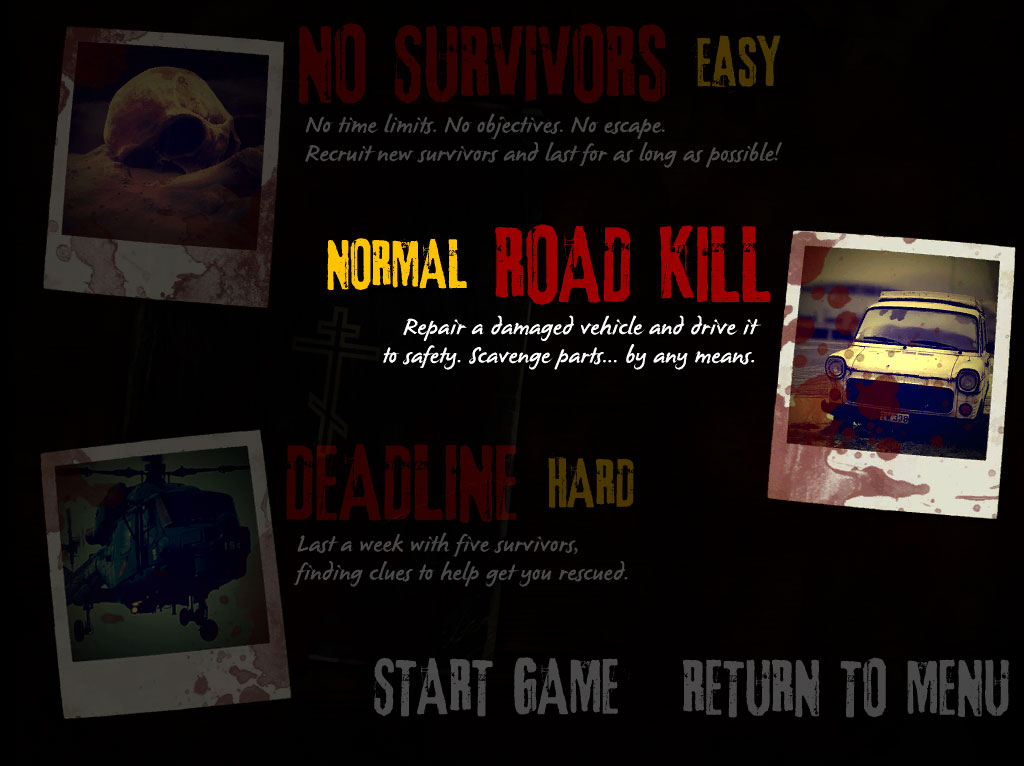
As of version 1.2, there are three modes.
No Survivors
Start with a single survivor, recruit new members to the group, and survive as long as you can.
This is an easier mode and suitable for new players, as well as advanced players who want to see how long they can last.
- No objectives, no victory condition
- Fewer aggressive dilemmas
- Some buildings produce resources
- New survivors can be discovered and recruited – or rejected
- Fewer zombies in houses
- Zombies enter the town at a slower rate
- Zombies can overrun and destroy locations
Road Kill
Starting with a group of five survivors, find and repair a vehicle to leave the town. If you want an objective, but without the pressure of a time limit, Road Kill is a good choice.
- Find and repair a vehicle, scavenging any necessary parts.
- Some aggressive dilemmas
- Start with five survivors
- Survivors can’t be replaced if they die
- No time limit
Deadline
This is the hardest mode. It has many aggressive dilemmas and a tight deadline. Even if you manage to survive the first few days, you still might not make it to the chopper in time.
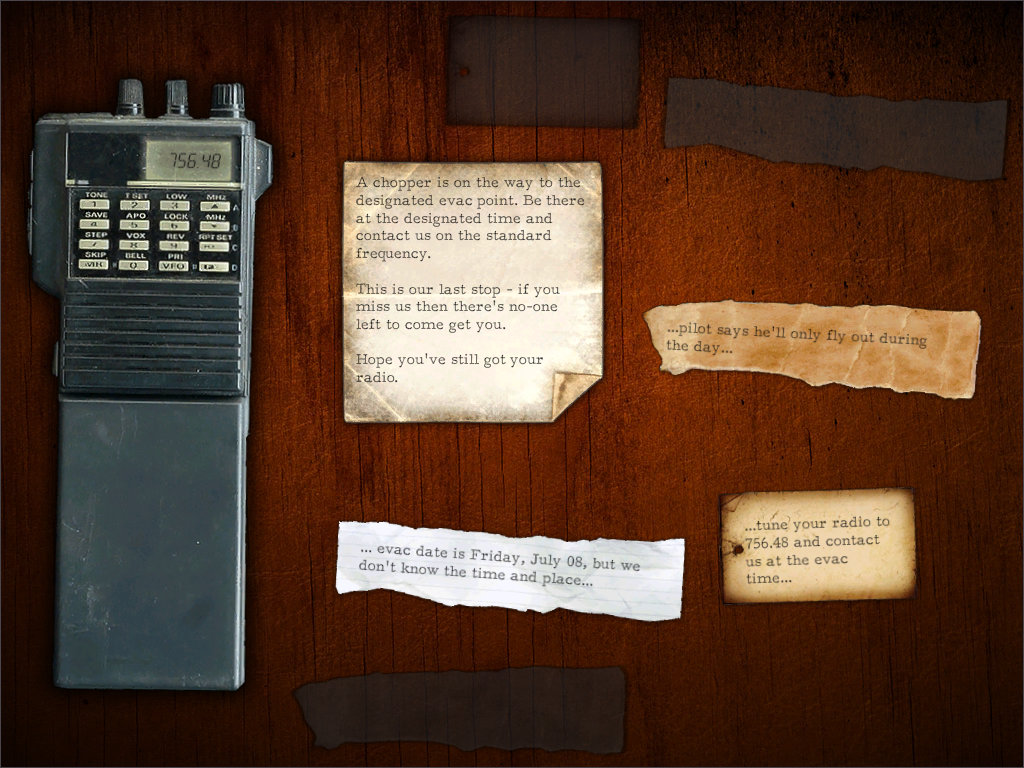
- Find a radio, the radio frequency and the location of an impending rescue location
- Time limit of 5 – 7 days
- Many aggressive dilemmas
- Survivors can’t be replaced if they day
- Start with five survivors
Interface
Main menu
The main menu provides a few options:
- Start a new game – if a game is in progress, it will be deleted
- Continue game – this will reload your current game
- Read a diary – read an exported diary from a finished game
- Edit a diary – exits the game and loads up an external editing application
- Custom content manager – add photos, survivors and locations to the game. See Customising your game
In-game navigation
Zafehouse: Diaries contains a number of screens:
- Diary view
- Planning view
- Rescue items
- Survivor view
- Movement strategy
All screens are accessible with the mouse, but you may find the following shortcuts make it easier to move between screens.
A: Move ‘left’ from the Planning view to the Diary; and from the Diary to the Rescue Items.
D: Move ‘right’ from the Rescue items screen to the Diary; or from the Diary to the Planning view
S: Open the survivor screen when on the Map screen
Z/X: Scroll through survivor dossiers on the Survivor view; turn pages in the Diary
Diary view

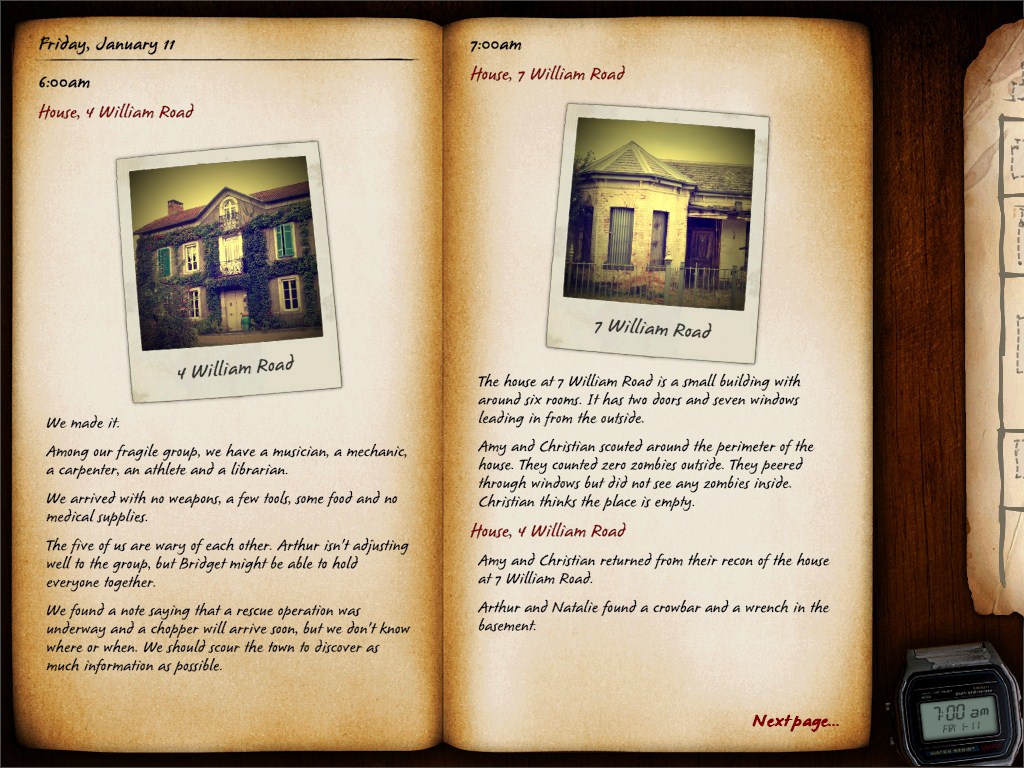
The diary records your progress and provides hints and useful information about what happened in the previous hour.
As the diary fills with notes, use Z / X, or click Previous page / Next page to turn pages.
Clicking the map to the right-hand side will open up the Planning view; click the thin red hot zone (see screenshot) over the far-left edge of the screen to view your collected Rescue items; left-click the watch to advance time by one hour and right-click the watch to advance time until something new is written in the diary.
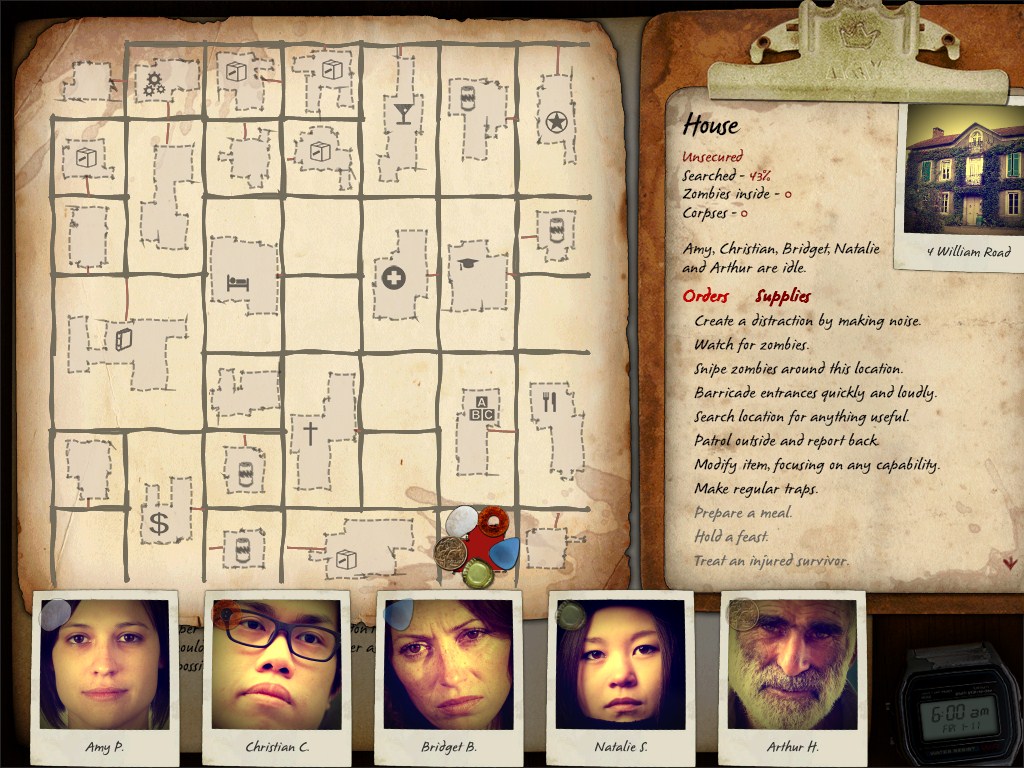
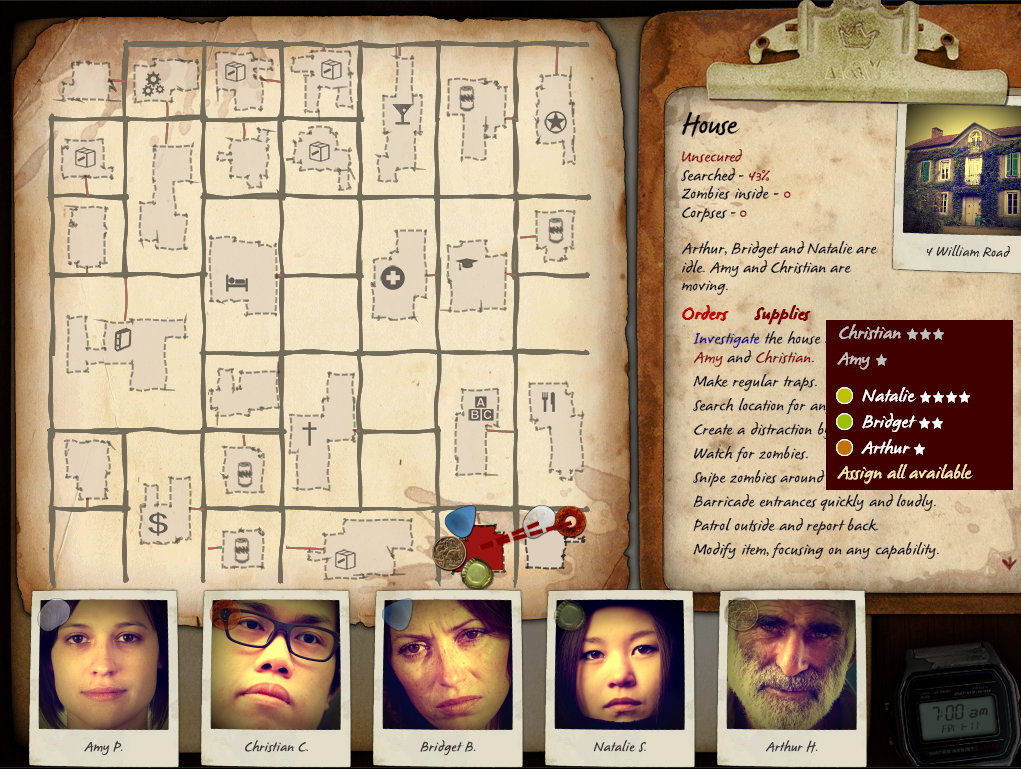
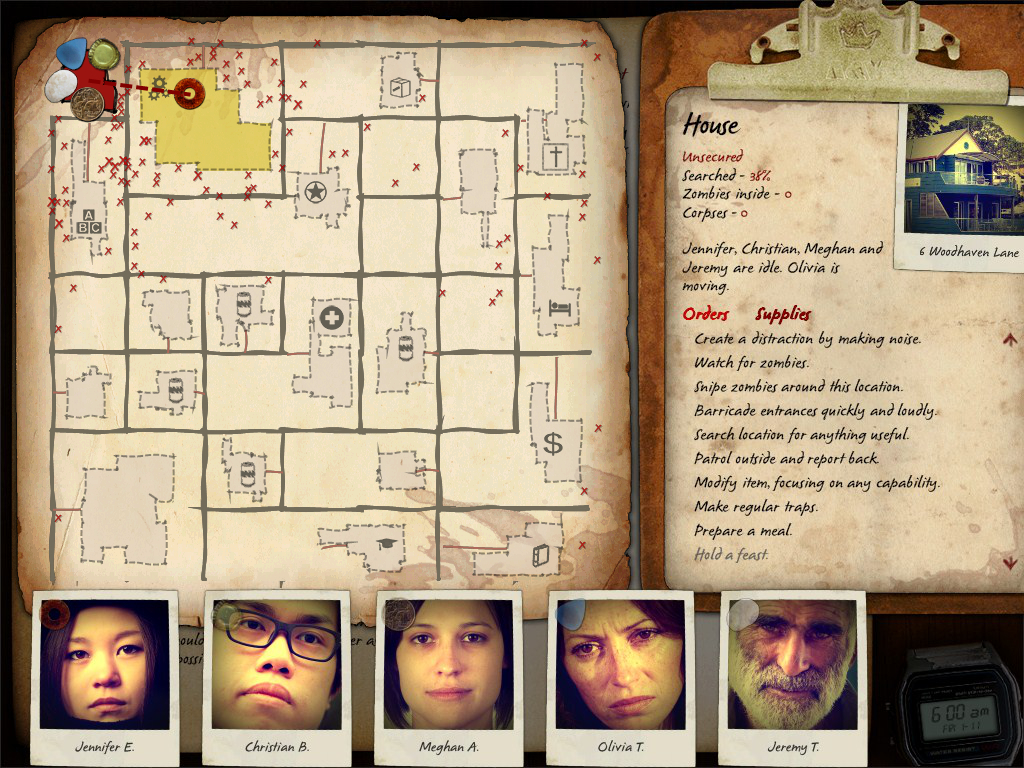
Planning view
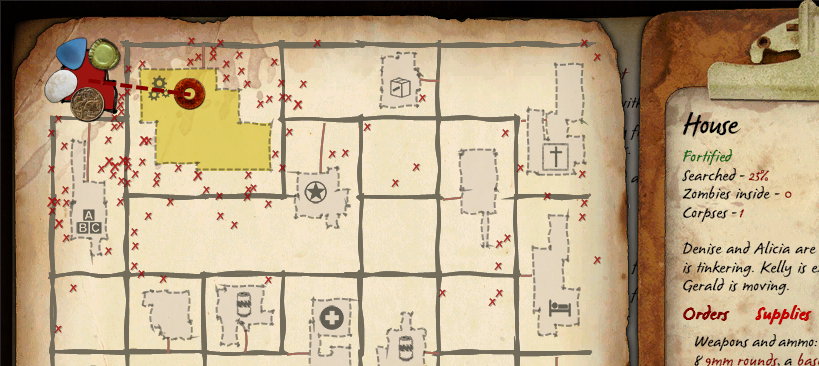
Map
You can issue orders from the Planning view and get some information about the current state of the environment as per the time on the clock.
The map shows your survivors, locations, streets and spotted zombies. All locations are attached to a street, indicated by a red line.
The main map displays tokens that correspond to a survivor – the token will match the shaded token on one survivor’s photograph. You can move survivors to new locations by dragging their token. You can pick up the token directly or click and hold the shaded token on the survivor portrait.
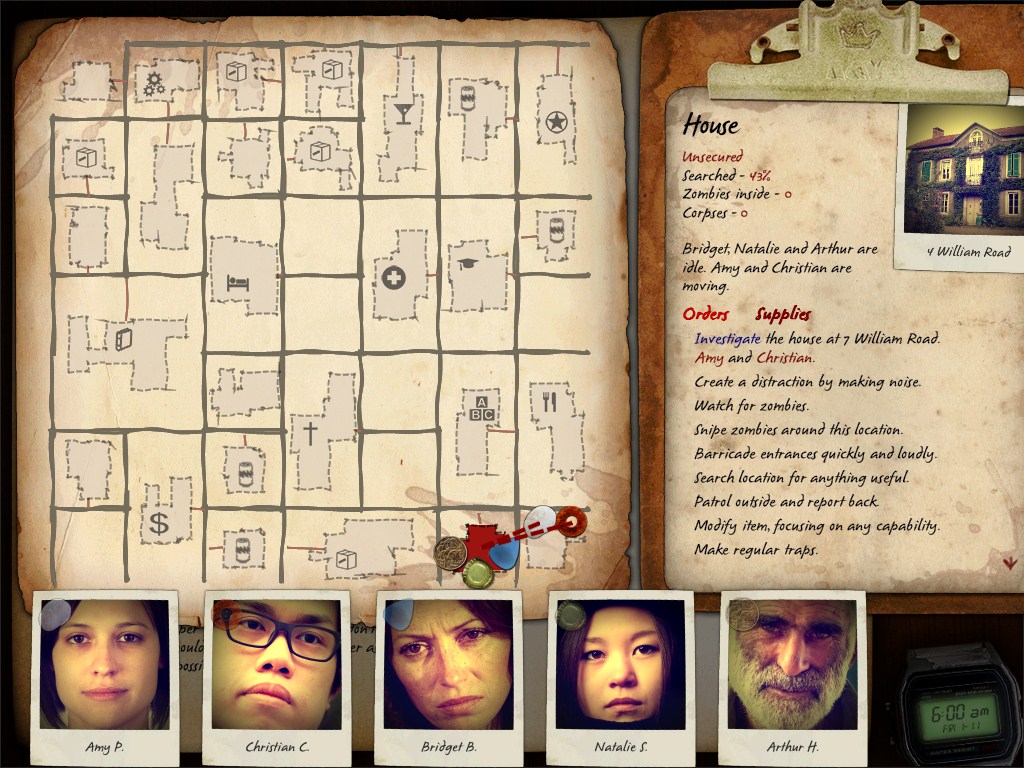
Note the addition of the movement order to the Order list on the right-hand side. Clicking on the blue text will take you to the Movement strategy screen (see below).
Various elements on the map can change to reflect your environment:
- Visited locations will have dark borders
- Secured locations (entrances have been blocked) have solid borders
- Fortified locations (entrances have been blocked and fortified) have thicker borders
- Locations with zombies inside will glow red and no orders will be possible for that location
- If a survivor is en route to a location, the dotted line will be darker in front of the survivor and lighter behind. If there are two or more survivors in the movement group, only one token will be shown – hover over it and the portraits of all survivors in the movement group will glow.

- If a zombie has been spotted, it will show on the map. The colour of the ‘x’ will fade according to how long ago it was spotted, before eventually disappearing.
- Location type is also displayed by an icon. See Locations.
Clipboard
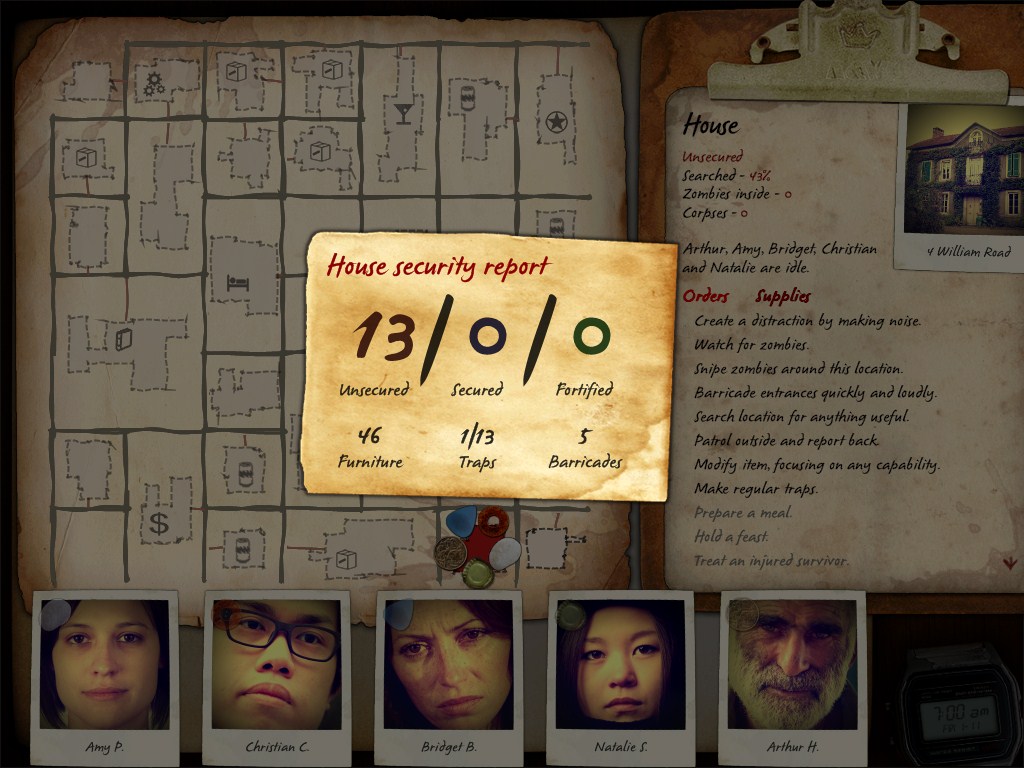
The clipboard on the right displays information relevant to the selected location. The upper portion contains a summary of important details:
- Security status: A location is ‘secured’ when entrances have been blocked and ‘fortified’ when they have been fully barricaded and reinforced. See Orders – Barricade entrances for more information.
- Searched: number of rooms searched as a percentage of all rooms in a location
- Traps: number of traps set in a location
- Zombies spotted inside: the number of known zombies inside a location. If survivors have visited the location but are no longer present then there may be a figure listed with a question mark, indicating that this was the last known number of zombies at the location.
Clicking on the security status will display a note showing more detailed information about the location’s security.

Below the summary are the Orders and Supplies lists.
- Orders: the list contains orders that can be given at that location, at the current time. For example, Snipe zombies will only be available if there is a firearm and ammunition available at the location.
Greyed-out orders will become available when certain conditions are met. Hover over the text to find out what needs to happen before that order becomes available.
To issue an order, first assign a survivor. The star rating indicates how effective they are. Generally, 4 or 5 stars is good, 3 is average, and 2 or 1 should be avoided. You can assign more survivors if you wish. The coloured icon indicates what kind of change the assignment will make to the average relationships of all assigned survivors.
For example, if the survivor you’d like to add has a red circle, then adding this survivor will lower the average of all relationships on the task, meaning the survivors won’t work well together.

Some orders will let you designate a strategic option. This will show up as a green highlighted word or phrase – select this and choose your option from the drop-down menu.
When you order a survivor to move, a special order will be created. You can assign other survivors to this order in the same way as any other order.
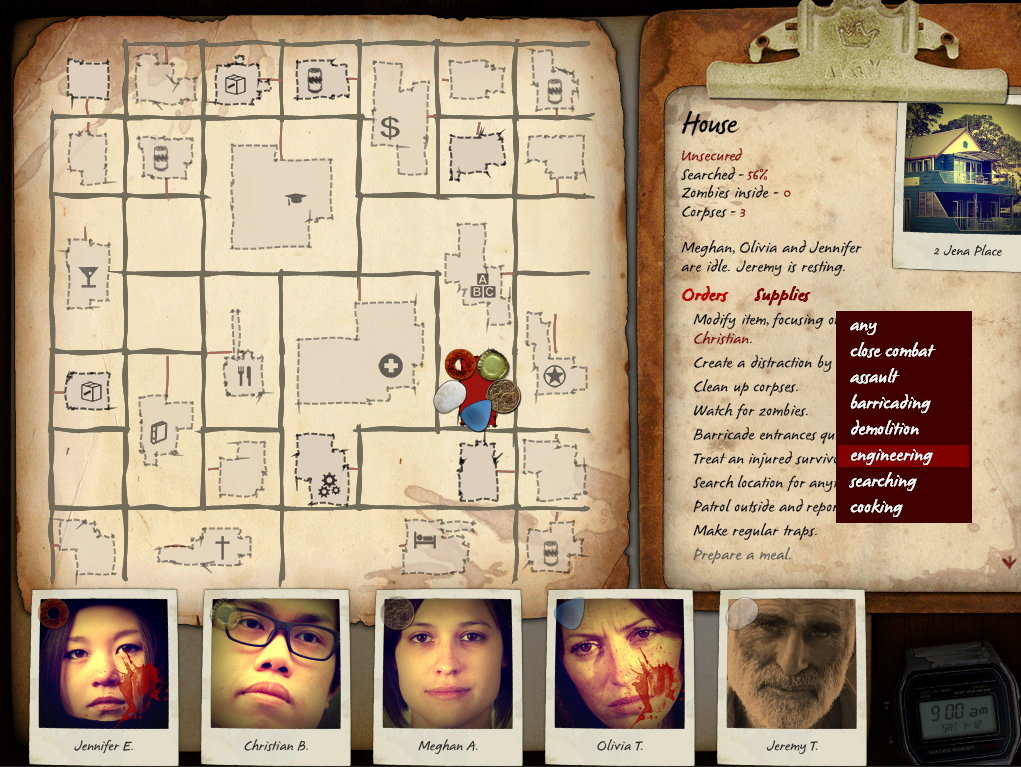
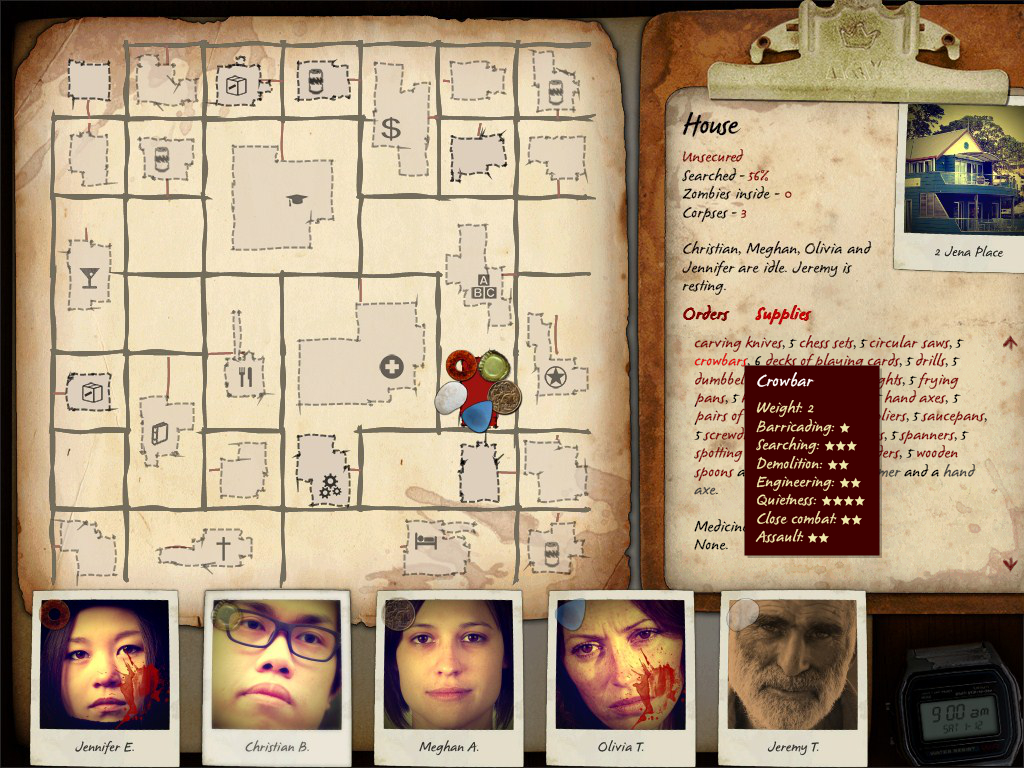
- Supplies: this is a list of items that have been found at a location. Hovering over an item will display a tooltip showing its capabilities and uses.
If a survivor is currently using an item, then it will appear greyed-out. Hover over the item to find who is using it and for what purpose.
Survivor portraits
The current group of survivors are displayed as portraits along the bottom of the screen. Clicking a portrait or pressing ‘S’ on the Planning view will change to the Survivor view; right-clicking on a portrait will show a summary of the survivor’s state.

The colour and face of the portrait can also change.
- Default, colour photograph: Survivor is at the selected location
- Black and white: Survivor is not at the selected location
- Sepia: Survivor is resting and unable to be given an order (except for moving)
- Bright blood stain: Survivor has been injured; more blood stains mean the survivor has more injuries
- Faded blood stain: A survivor was injured and their wound was treated, but it is still hindering the survivor’s capabilities (eg, a broken arm may have been treated with a splint, but the survivor will likely struggle to hold a weapon).

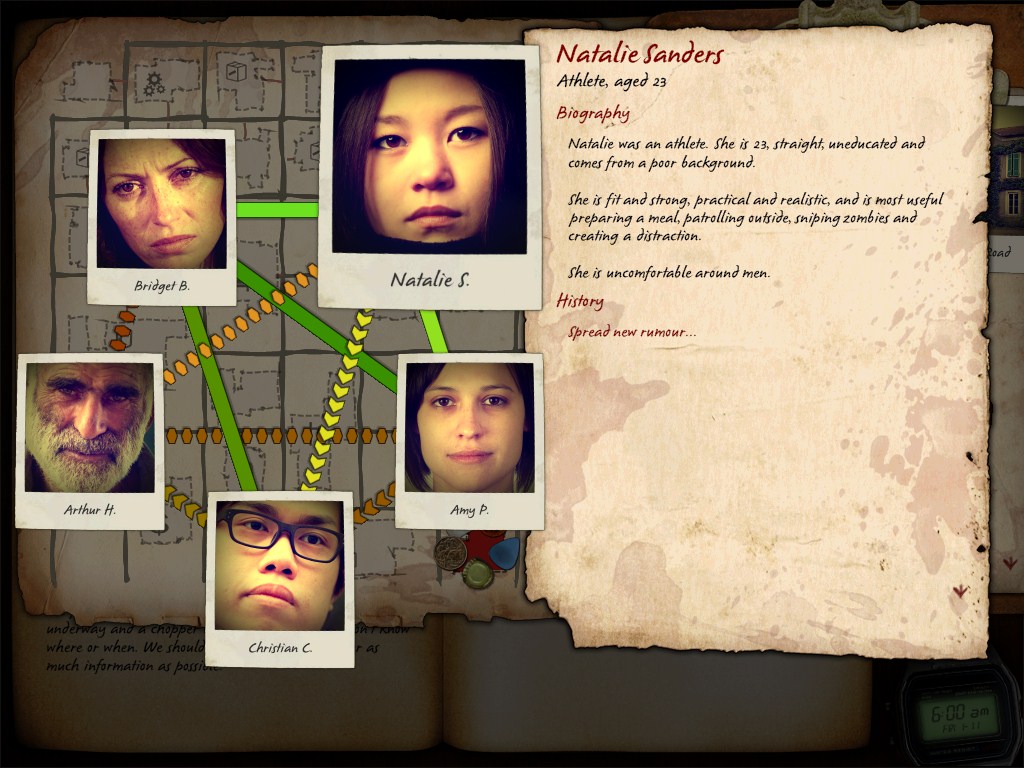
Survivor view
This screen lets you view relationships, examine your survivors and start rumours.
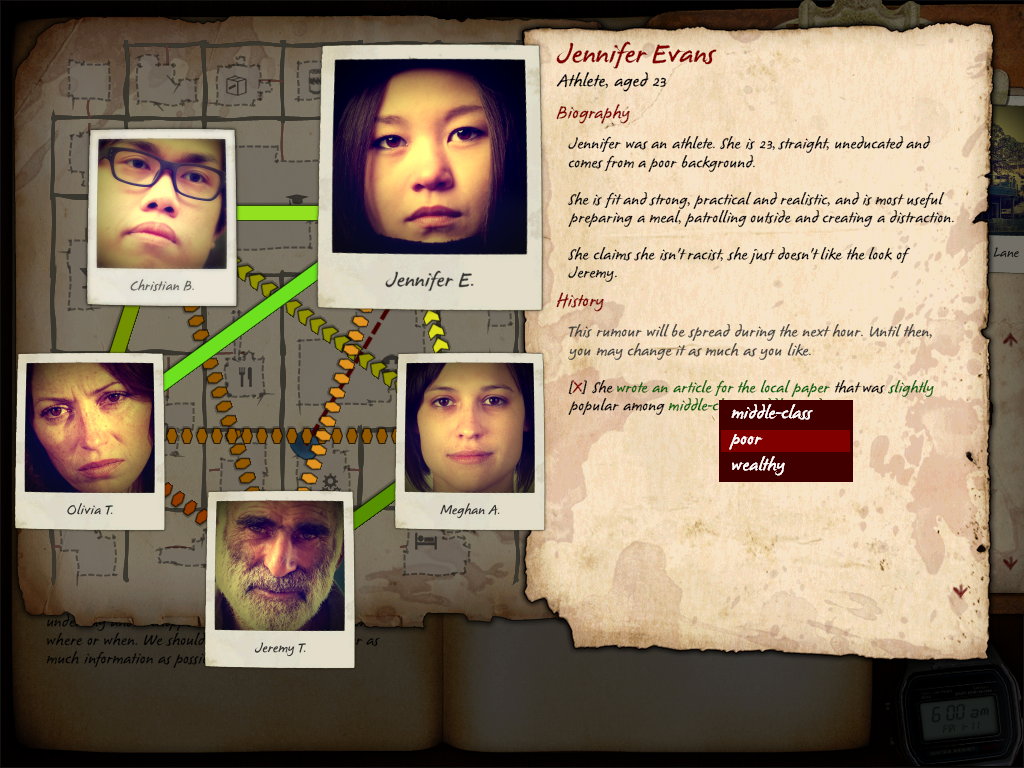
- Relationships are represented by a coloured line – from red to green – where red is a negative relationship and green is positive. If the line consists of arrows, one survivor is prejudiced against the other, according to the direction of the arrow; if the line consists of hexagons, then survivors are prejudiced against each other. See Relationships for more information.
- The page on the right displays some background on the selected survivor, including their prejudices and whether they’re especially useful at something. You may see a small note clipped to the top right of the page – if your survivor has any active bonuses or penalties, the affected trait will be listed.
- One rumour can be started each turn. To do so, select ‘Start a rumour’, then alter it as you wish by clicking on the green highlighted links. See Relationships – Rumours for more information.
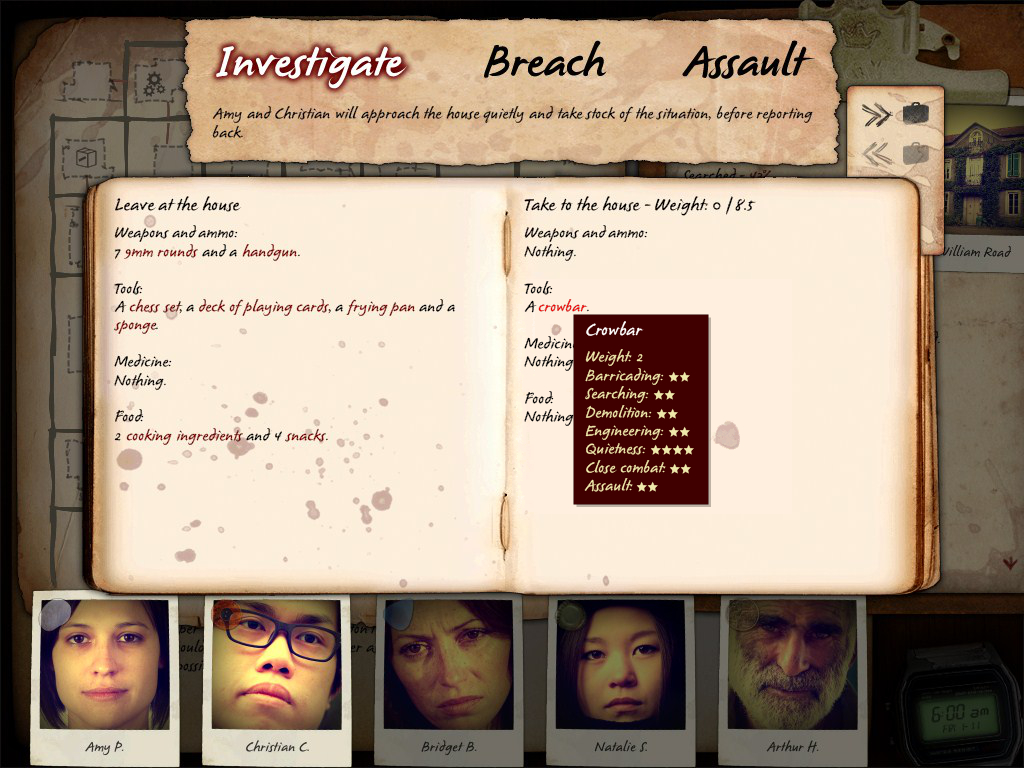
Movement strategy
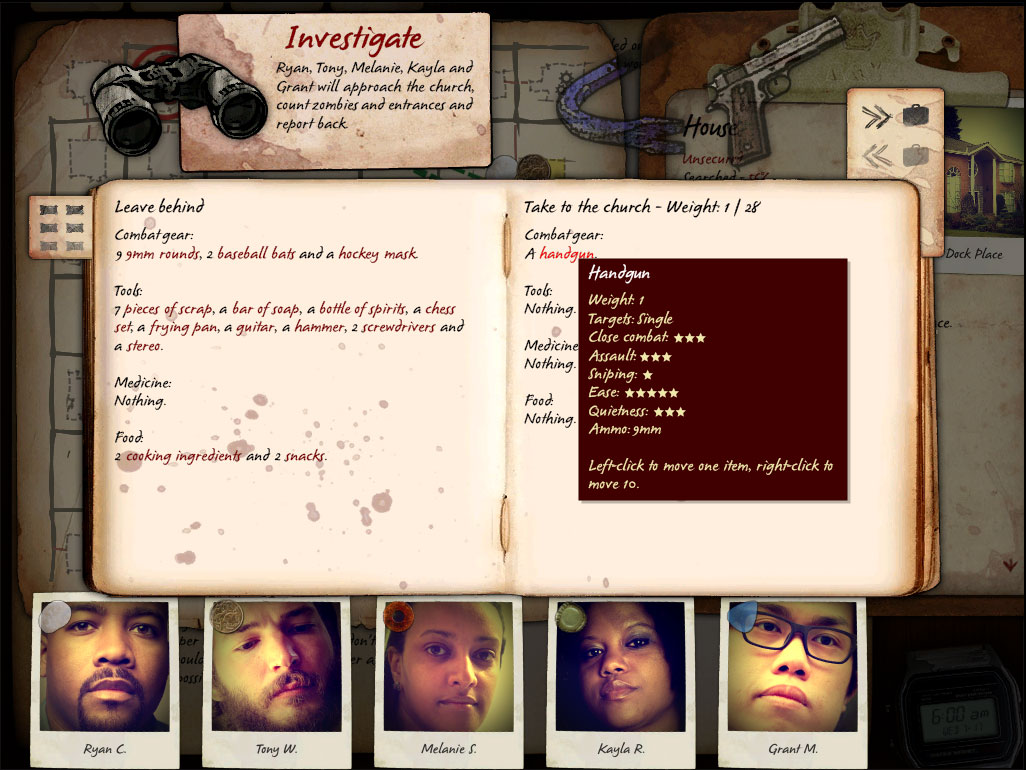
By default, when you order a survivor to move to another location, they will investigate the destination and then return to the origin. To order your survivors to breach or assault the location, select the command at the top of the screen.
Rarely will you want to send your survivors empty-handed. Click an item on the left to take it with you; right-clicking will move 10 of the same item at once.
On the left-hand side, you can select a sorting option. This will let you quickly identify the best items with a given property.
Clue screen – Deadline and Road Kill only
This screen stores all the information you’ve collected about the impending rescue operation (Deadline) or vehicle repair job. This is a display screen only. Some notes may update, such as the vehicle repair progress. In Deadline, the radio frequency will appear on the radio when discovered; the radio will also be used automatically to contact the chopper if you’re at the rescue location.
Clues can be discovered by searching locations, cleaning corpses, responding to dilemmas, and other events. The best strategy is to visit as many locations as possible and designate your survivors to search each one.
Remember that you need the radio and frequency for Deadline, but the location hints are optional (just ensure you have enough information to pinpoint the rescue location). Road Kill requires both a fully-repaired vehicle and a road map.
Survivors
Your survivors are complex. They have needs, motivations, skills, talents and prejudices. Managing your survivors is key to success.
Occupations
All survivors have a former occupation. This should give you some hints as to how you might use them. Note that your survivors are not totally defined by their occupation and may have other strengths or weaknesses.
Current occupations are: surgeon, police officer, cleaner, athlete, carpenter, engineer, mechanic, firefighter, chef and librarian.
Effectiveness
When clicking on an order in the Planning view, you’ll note star ratings next to each available survivor. This represents how effective a survivor is at a task. The effectiveness rating is influenced by a survivor’s capabilities and their motivation.
Capabilities
This is the physical or cognitive potential to do something well – which is related to a survivor’s attributes and any active modifiers. There are dozens of positive and negative modifiers in the game, from injuries and intoxication, to exercising and reading.
Motivation
Survivors are motivated to perform tasks, which will have an effect on how well a survivor will perform. For example, two people may be equally capable of a task, but they may differ in how enthusiastic, productive or happy they are when doing it.
In gameplay terms, motivation modifies a survivor’s capability, so that even highly capable survivors may struggle if they lack motivation or interest, while highly motivated survivors may still perform well even if their capabilities are lacking or they’re injured.
Injuries
It’s highly likely your survivors will become injured, either by zombies, another survivor, or some other special event. Injuries are serious and should be treated as soon as possible, otherwise they may develop into an infection, cause fevers, or at the very least, reduce the survivor’s capabilities.
Injuries require the right medication to treat an injury (see Orders – Treat injury). Once treated, the survivor may still be affected by the injury, but the effect will be less than if it were untreated.
Injuries are classed as contusions, concussion, lacerations or broken bones. You can view a survivor’s treated and untreated injuries by right-clicking on the portraits in Planning view.
Items
Unlike other games, you do not manage survivor inventories. Instead, if a survivor feels an item will be useful for whatever it is they’re doing – fulfilling an order, performing an idle activity, or engaging in combat – then they will claim it. If a survivor is using an item, then it will appear greyed-out on the Supplies list.
You can also right-click the portraits in the Planning view to see who is holding items.
Strategically, this means you don’t have to micromanage inventories, but you should ensure that your survivors have access to items and weapons at a location.
Relationships
Mastery of the game involves paying close attention to survivors’ relationships, juggling their prejudices, and cannily crafting some rumours to give relationships a nudge in the right direction.
Prejudices
Every survivor has a prejudice. Some may be broad, such as gender, while others may be specific. Prejudices have a range of effects in the game, but the most important effect is that they magnify the negative effect of a relationship change.
For example, if Frank and Jane are barricading entrances and Jane, who is very poor at barricading, doesn’t do a good job, then Frank and Jane’s relationship may suffer slightly.
If, however, there is a prejudice between Frank and Jane, then the negative impact on the relationship will be greater. If both Frank and Jane are prejudiced against each other (a double prejudice), then the impact will be severe.
In other words, prejudices can turn a minor inconvenience into a severe argument – or worse.
Effects
Relationships affect many aspects of the game. Part of the game’s challenge is figuring out how relationships impact your decisions, but two of the more obvious aspects are task effectiveness and combat.
If survivors are getting along well then they’ll perform better when assigned to the same order; consequently, negative relationships will result in poor performance.
Similarly, relationships affect how well your survivors will perform during combat. If your survivors are getting along then they’ll stick together; if not, they’ll split up, run through the location, and generally just make a mess of things.
Remember: relationships not only affect performance, your performance also affects relationships. Watch you don’t get caught in a negative feedback loop.
Influencing relationships
Relationships adjust constantly throughout the game. Typically, they’ll reflect how much attention you’ve been paying to them – if you’ve neglected relationships, don’t be surprised when you open up the Survivor view and see a lot of red lines.
There are two ways you can affect relationships: directly through rumours or indirectly through careful survivor management.
Rumours
You can create a rumour by clicking ‘Spread a rumour’ on the Survivor view. Adjust the content of the rumour to influence the group’s opinion of the survivor. Be careful when starting a rumour – some survivors may be unimpressed by the news.
You can issue one rumour every 24 hours. Rumours fade after about a week.
Be positive
You can subtly affect relationships by creating positive environments for your survivors. There are many ways you could go about this, but here are some hints:
- Survivors who do well on a task will feel closer to each other
- Survivors who aren’t getting along will have more opportunities to fight and argue if they are in the same location
- Poor relationships result in poor performance and negative combat outcomes – which in turn affects your relationships. Avoid getting into these negative feedback loops
- Give them some space to socialise, perhaps you can hold a feast
- Survivors might be less willing to argue or fight in a particular location
- Don’t be afraid to sacrifice someone for the good of the group
Orders

Survivors can be assigned to an ‘order’. Assigning the right survivors to the right orders is key to any successful strategy.
Zafehouse: Diaries factors in a lot of variables to determine if your survivors do a good job: survivor capabilities, tools being used, relationships of survivors involved, and other environmental variables.
Some orders will only become available if a certain item is present. For example, the ‘snipe’ order will only appear if a firearm and ammunition are present at the location; the ‘prepare a meal’ order is only available if the survivor has access to at least 3 cooking ingredients.
Some orders also have strategic options indicated by green highlighted text. Selecting the text will allow you to adjust the order.
Barricade entrances
Your survivors will start to barricade doors and then windows. If they do not have barricades, they will break down furniture at the location.
There are two strategic options: slowly and quietly; quickly and noisily. The former will see survivors using only quiet tools to slowly barricade an entrance. Survivors will work together on the most accessible entrances first.
The faster option will see survivors quickly barricade doors and windows, using the best tools available. This will result in quickly barricaded location (assuming the survivors are effective at barricading and have strong relationships), but will create a lot of noise at the location.
Barricade reports will appear in the diary and on location summary in the Planning view. See Locations for more information about security states.
Watch for zombies
Knowing how many zombies are milling about gives a range of bonuses. For example, it makes you more prepared if zombies manage to break in, and helps you avoid zombies when leaving a location.
When zombies are spotted they’ll appear as a red ‘X’ on the map; large groups of zombies are represented by a larger ‘X’. If a zombie was spotted more than an hour ago and hasn’t been seen since, then a faded ‘X’ will appear on the map where it was last seen. Eventually, the X will fade away unless it is spotted again.
Although your survivors will ‘passively’ spot some zombies at a location or while moving, this won’t always be accurate. To get an accurate report on the number of zombies nearby, you will need to specifically put someone on watch.
Survivors who are actively on this task will not only spot zombies nearby, they’ll also spot zombies around neighbouring locations. To increase the accuracy and range, assign some good spotters and ensure there are binoculars or other spotting tools at the location. Your spotters will also work better during the daytime.
Your spotters will also provide feedback on how much noise you’re making at the location. The noisier your location, the more zombies you’ll attract.
Other orders and activities may also spot zombies, such as sniping and moving between locations.
In No Survivors, you also have the option to attract any roaming survivors using a flashlight or beacon.
Make traps
Adding traps to a location can give you the edge in combat, especially if you don’t have time to barricade. If you’re feeling brave, try an experimental trap. These can have huge effects, but they might misfire.
Locations have a limited number of slots available for traps, which is reflected in the location summary on the Planning view.
Treat injuries
If a survivor is injured and you have the right medical supplies available, you can assign survivors to treat the injury. Any survivors added to the order will collaborate on treating injuries.
If an injury can’t be directly treated by any medical supplies at the location, then they may use painkillers (if available) for temporary relief.
Snipe zombies
Order survivors to shoot lurking zombies. It might create some noise, but it’s a good way to clear zombies off the front lawn without exposing yourself. Alternatively, you can order your survivors to shoot zombies inside neighbouring locations. It’s not easy and it relies on zombies wandering in front of a window, but a good sniper may be able to reduce zombie numbers enough for your survivors to successfully breach the location.
You’ll need a firearm and ammunition to issue this order.
Patrol
If you’re feeling confident you can send some survivors outside to look for zombies. It is more effective than the “Watch for zombies” order, but your patrolling survivors may get attacked while on patrol. You can select to patrol and ‘report back’, or patrol and ‘attack zombies’. The latter will result in your survivors actively attacking any zombies they see.
Prepare a meal
Meals are the best way to keep your survivors fed. If you have at least three cooking ingredients, you can prepare a small meal which will be consumed by one survivor. If you have 25 ingredients, you can prepare a large meal. Large meals are only consumed on the “Feast” order, or if a survivor is starving.
Clean up corpses
After a battle, zombie corpses start to accumulate at a location. This can have a range of negative consequences, so it’s best to clean them up as soon as you can. Your survivors may also find some useful items while cleaning zombies, and may even discover a rescue clue.
Feast
If you have three large meals prepared you can hold a feast at the location. This will result in all survivors increasing their relationship to maximum, but creates noise at the location.
Modify items
Survivors can modify tools or weapons to increase their capability. Only one attribute of the item is boosted, and an item can only be modified once.
Search location
Almost all locations have concealed or hidden items. While your survivors may choose to explore when idle, the fastest way to find items is to actively search for them. You can prioritise which items to look for, which will speed up the search for that class of items, at the expense of other items.
Searching a location might also reveal a rescue clue. If the location has a clue then a searching survivor will find it in the first hour, which means you don’t have to have survivors thoroughly search a location just to find a note.
Create a distraction
Zombies aren’t too smart. You can lead them toward a location by creating a distraction. You can create a small distraction (make noise) at any time, but you’ll need a stereo to create a moderate distraction (play music) and gasoline and a lot of furniture items for a major, town-wide distraction (a bonfire).
Road Kill orders
Repair vehicle
Survivors will attempt to repair the vehicle at a location, provided there are required vehicle parts at the location.
Leave town
If you’ve found the map and the vehicle has been repaired, assign all survivors to the task to leave the town and complete the game. Make sure everyone is at the same location.
No Survivors orders
Collect ingredients
If the location has a greenhouse, it will periodically produce ingredients that must be collected. There is a limit on how much can be produced per day.
Produce ammunition
If the location has an ammunition reloader, survivors can use it to create a specific kind of ammunition.
Create medicine
Survivors can create painkillers and antibiotics at a medical lab. This is a difficult task and may take a long time.
Moving
To move your survivors to another location, pick up their token and drop it on the destination. You’ll notice that a special movement order is added to the order list indicating who is moving where and what they’ll do when they arrive.
By default, your survivors will investigate. You can change this to ‘breach’ or ‘assault’ by clicking the blue text and selecting an option at the top of the screen. Below, you can also select items to take with you. To add survivors to the movement order, click on the order and add them by name, or drag their token to the destination.
Investigate
Your survivors will move to the destination, sneak around outside and then peer through windows. They will report how many zombies they see – inside and outside – and return to the origin.
Note that, just as with the spotting order, the number of zombies reported may not be accurate. For example, if the investigating survivor was not very effective at spotting zombies, he or she may miss a few. Similarly, if zombies are lurking in a windowless basement, then survivors will not be able to see them when peering through windows.
Investigating during the day will likely produce more accurate reports. Survivors carrying items with a spotting bonus will also perform better.
Assault
When survivors assault a location, they will first surround the location and attack from a distance (if they have firearms and ammunition), and then move in for some melee combat outside the location. They will only engage in melee with a zombie or group of zombies if they’re confident they’ll win.
Finally, survivors will shoot at zombies through windows. If survivors are certain the location is empty then they will enter and stay at the location, otherwise they will return to the origin.
Breach
This will result in survivors entering a location through one of its entrances and fighting whatever is in the room they enter. Which entrance they choose will depend on how accessible the entrance is, how many zombies are surrounding the location, and how well your survivors are getting along.
Once inside, your survivors will be ‘trapped’ until all zombies in the house have been killed. Depending on how many zombies are still inside after the initial breach, they may end up locked in combat for a couple of hours.
Remember to select breach whenever you want survivors to move inside a location, even if there are already survivors at the destination.
Idle activities
If survivors haven’t been given a order, they are considered idle. They may stay idle for a couple of hours or, more likely, they will perform some kind idle activity. There are many idle activities but, like orders, they are only available to survivors under certain conditions.
At any moment, an idle survivor will prioritise available idle activities according to which activities interest them.
Here are some of the most common idle activities your survivors might engage in. There are many more – keep a survivor idle every now and then and see what happens.
Share a drink
A survivor will try and convince another survivor to have a drink. If successful, both survivors will get intoxicated. Their relationship may also be positively or negatively affected.
Play solitaire
A survivor will grab a deck of cards and play a game of solitaire. If the location is quiet and the survivor is uninterrupted, then they may feel smarter after the game.
Exercise
One or more survivors might choose to exercise together, making them feel fit and strong afterward. If survivors are getting along, then they may have a good workout. If there’s an athlete at the location, he or she might give them some tips.
Tinker
This is similar to the Modify item order. A tinkering survivor will select an item and modify one of its properties to potentially great effect. Unlike the Modify item order, tinkering can also have a negative effect on an item’s property, and will take longer to complete.
Maintain barricades
If you’ve erected some barricades and they’ve taken some damage, a survivor may make some impromptu repairs.
Explore
Exploring a location is similar to the searching order. Exploring survivors will turn up fewer items, but they are more likely discover hidden items. As with survivors who are searching, exploring survivors will also discover rescue clues.
Resting
The game tracks each survivor’s fatigue. As they start to tire, you’ll see a note on the reverse of their portrait indicating how tired they are. When they’re exhausted, they’ll stop whatever they’re doing and rest. When resting, survivors can’t be given orders (except for moving between locations) and won’t perform any idle activities. However, they may find themselves embroiled in some events, dilemmas and combat.
Of course, survivors may choose to rest at inopportune times. Ordinarily, you don’t have control over resting, unless your survivors are in a hotel. This special location will allow you to issue a Rest order.
Events
Whenever the clock ticks, the whole town spins into action. Survivors argue, socialise and try and fulfil their orders, zombies move through streets and attack barricades, meals get eaten, the rescue chopper circles overhead, and more.
All of these are logged and, if relevant to the survivors, will generate a report in the diary describing (or hinting at) what happened. Here are some of the most common events.
Survivor interactions
Even if you don’t have survivors on the same order, they may still interact with other during the course of an hour. These interactions can be positive or negative, depending on how well they’re getting along, and the effect on the survivors – and the rest of the group – can be minor or major.
Zombie breach
When one or more zombies manages to break into your location, a combat event is triggered. Your survivors will make a plan and try and defend themselves. Combat is extremely complex, factoring in location variables, traps, room sizes, survivor attributes, weapons, furniture, relationships and more.
Location events
Just being in a location might trigger a location-based event. See Locations.
Eating
As survivors get hungry they’ll find something to eat. Generally, they’ll eat what’s appropriate for their level of hunger – if they’re feeling slightly hungry then they’ll eat a snack, if they’re famished then they’ll dive into a meal.
Locations
Successful strategies need to account for the strengths and weaknesses of the game’s locations. When you discover a location, your survivors will report on the number and type of rooms, the number of entrances, whether you’re likely to find a cache of a specific item type and, in the case of special locations, a hint about a location’s benefits.
Security
Zombies will try to enter a location through one of its exterior entrances: a door or a window. To prevent zombies entering, you should order your survivors to barricade entrances. Survivors will barricade sensibly, starting from the most accessible entrances, such as doors, before moving onto windows. If all entrances have barricades, then the location is considered ‘secure’ and zombies will have a difficult time getting inside.
If you plan to stay around, then you should consider fortifying the location by keeping your survivors assigned to the barricade order. Once the location is secure, your survivors will then add reinforced barricades to the entrances.
Special locations
This is a list of special locations in the game. Your town may have more than one of each, or none at all.
Church
![]() Solemn, calming places.
Solemn, calming places.
Bank
![]() Money’s not much use anymore, but banks have a tendency to be secure.
Money’s not much use anymore, but banks have a tendency to be secure.
Factory
![]() What better place to go when you want to make something?
What better place to go when you want to make something?
Hospital
![]() An obvious place to get medical supplies and treat your injuries – if you can clear the zombies out first.
An obvious place to get medical supplies and treat your injuries – if you can clear the zombies out first.
Hotel
![]() All those beds look comfy.
All those beds look comfy.
Warehouse
![]() You never know what you might find – or who might come bearing gifts.
You never know what you might find – or who might come bearing gifts.
Library
![]() Find a good book and enjoy the fruits of knowledge.
Find a good book and enjoy the fruits of knowledge.
University
![]() Just being here makes you feel smarter.
Just being here makes you feel smarter.
Police station
![]() Hope they still have some guns lying around.
Hope they still have some guns lying around.
Store
![]() Stock up on some essential supplies.
Stock up on some essential supplies.
School
![]() You swear you heard footsteps running down the corridor…
You swear you heard footsteps running down the corridor…
Items
There are dozens of items in the game. All items have a primary class (eg, food), but some may have a secondary a class. For example, a screwdriver is a tool (primary) and weapon (secondary).
Items are used to make some tasks easier for survivors (eg, a hammer can be used to barricade entrances); some items are necessary to complete a task (eg, a firearm and ammunition must be available to assign orders to snipe zombies); and others are consumed when used (eg, snacks, ammunition, cooking ingredients, bandages).
Item classes
Here are the main item classes in the game.
Combat gear
Weapons are especially useful in combat. They include melee weapons and firearms, although many other item types – even furniture – can be used as weapons. This category also includes protection gear, such as helmets, vests and shields.
Tools
Tools mostly help your survivors perform better on some tasks. Some tools provide multiple bonuses, and many can also be used as weapons.
Furniture
All locations have furniture, but these do not appear in the supplies list. Your survivors will primarily destroy furniture to generate barricades and scrap materials.
Medical supplies
Injuries are treated with the correct medical supplies.
Food
There are four main types of food items: cooking ingredients, snacks, small meals and large meals. Cooking ingredients are required to make meals; large meals are required before you can hold a feast.
Item properties
Items can have one or more of the following properties.
Weight
Used to calculate how many items can be carried between locations. Heavier items with weapon characteristics may also be more difficult to wield.
Close combat
How useful the item is when fighting in close quarters (eg, defending a location against zombies).
Assault
Effectiveness of a weapon or item when assaulting or breaching a location.
Sniping
Accuracy over a long range, used primarily to calculate a firearm’s effectiveness on the sniping order.
Ammo
The type of ammunition used by a firearm
Quietness
How much noise the item generates when used. Noisy items contribute to the overall noise level at a location, which can attract zombies.
Engineering
Used for modifying items or making traps.
Barricading
Used for barricading doors and windows.
Demolition
Used for breaking down furniture into scrap and barricades.
Spotting
Increases accuracy in spotting zombies
Searching
Improves chances of finding something when searching a location
Treats
The types of injuries treated by the item.
Nourishment
How much benefit a survivor will gain from eating a food item; in the case of ingredients, it refers to how much it will contribute to the final nourishment of a meal prepared using the ingredient.
Combat
Combat is a part of life in Zafehouse: Diaries. There are many situations that can result in combat, such as:
- Survivors stumbling on a zombie while searching or exploring.
- Zombies entering a location.
- Patrolling.
- Breaching or assaulting a location.
- Some dilemmas.
Combat is a detailed simulation that takes into account relationships, survivors’ weapons, the location and many other variables. As with other orders and activities, you don’t have direct control over combat, but you can improve your survivors’ chance of success by making strategic preparations.
Improving your chances
- Survivors who are getting along will work better together.
- When zombies enter a location, your survivors will create a battle plan. If your survivors are getting along, they’ll stick together and coordinate their attack; if not, they may split up into different rooms.
- Survivors will choose the best weapon they can find.
- Traps will fire when zombies enter a room, either slowing them down or damaging them.
- When survivors are breaching another location, they will try to sneak into a room, fighting whatever’s in there; when assaulting a location, they will patrol outside, shoot through windows, and try and lead some zombies outside. In both cases, they will use the weapons you’ve ordered them to take.
Put simply, give your survivors access to good weapons, ensure they’re getting along, use traps to improve your defenses, and most of all, try to avoid combat as much as possible.
Aftermath
Combat can cause complications afterward that need to be dealt with.
- Injured survivors should be treated as soon as possible.
- Barricades may need to be replaced.
- The noise level at a location has likely been raised significantly, increasing the chance of another attack.
- Survivors may have used a lot of ammunition.
- Corpses will need to be cleaned up, otherwise food may become spoiled.
- Survivor relationships may have been adversely affected.
Strategy guide – Deadline
Before you start
Most tactical games give you all the information you could ask for and give you direct control over your pawns. Zafehouse: Diaries does things differently.
It intentionally and carefully limits the information you receive. You’re not a puppetmaster; there are no paperdolls; you don’t dress your survivors, select their weapons, dole out ammunition, tell them to eat, or command them to sleep. And crucially, there is no button that makes your survivors get along.
Instead, you work out a plan, build up a strategy, tactically set your survivors to work, and then piece together what happened by reading the feedback, clues and hints in the diary.
Big Picture
Zafehouse: Diaries has a simple goal: to collect Rescue Items, go to the rescue point and survive long enough to be rescued.
The first thing you should do is build up a big picture plan. This will provide a context for you to develop your strategies and make strong tactical decisions.
To build up a plan, recall that Rescue Items can be discovered in new locations or received after encountering certain dilemmas. Because you have no control over dilemmas, your general goal should be to explore the town. There are many big picture plans that could achieve this, but here’s a couple to get you started.
Loot and raid
This involves sending survivors out to new locations, either together or in smaller groups, and scavenging for supplies and Rescue Items.
Pros:
- Valuable items, including Rescue Items, can be retrieved early
- Survivors tend to have a good supply of food, ammo and medicine because they’re always discovering new locations.
Cons:
- Exploring new locations is dangerous
- Survivors tend to eat-and-run by consuming snacks, which aren’t nutritious
- Looting a location is not immediate, so you could be attacked while searching
- Survivors don’t have bottomless pockets – they can’t carry everything – so difficult choices must be made to select which items should be taken
Secure and expand
Survivors will create one or more secure bases and then slowly branch out, often returning to the previously secured locations.
Pros:
- Creates a secure base for holding items and defending
- Locations have special bonuses, which you’ll only be able to take advantage of if you stay around for a while.
- Survivors tend to have more time for support tasks, like preparing more nutritious meals and modifying weapons and tools
- Survivors have more downtime, meaning they can rest, tinker, play cards
Cons:
- Secure bases tend to be more ‘noisy’ and attractive to zombies
- Slow to discover potentially useful items, weapons and Rescue Items
- Entropy: food, medicine and ammo will eventually run out.
- Some locations also have penalties, meaning the longer you stay the more exposed you are to negative effects.
Strategies
Once you have a general plan in mind, you need to start thinking about strategies, otherwise you won’t last a day. The following three factors are crucial to any strategy:
- Survivor strengths and weaknesses
- Locations and items in the environment
- Relationship dynamics
But the world of Zafehouse: Diaries isn’t stable. Your well crafted plan can fall apart in a second, meaning you’ll have to adapt. Always revisit these three factors and respond appropriately.
Security strategies
This group of strategies is about securing locations and preparing for the worst.
Look but don’t touch
Knowing how many zombies are around gives your survivors bonuses to combat, helps minimise the impact of some dilemmas, and gives your survivors the edge when leaving or entering a safehouse.
To make sure you’re never caught off guard, set lookouts and patrols, and make sure your patrol team will just report, rather than engage zombies. This is especially good when you don’t want to attract attention (spotting and patrol-and-report do not produce noise), you don’t have any weapons and/or you don’t have time to secure a location.
Thin the ranks
Set up snipers and a patrol team to actively engage surrounding zombies. This is good if you have ammo to spare, your survivors are competent at engaging zombies at close range, you’re not too fussed about noise and you don’t have structural defenses (barricades or traps). It’s also good if you’re on the run and don’t plan to stick around.
Trap happy
Fill the safehouse with traps, which will damage or slow zombies down as they enter. It’s a risky strategy on its own, but it’s quieter and faster than completely barricading a place, and it can give a weak group of fighters the edge in combat.
Dig in
Barricades are the most effective way to secure a location, but it takes time and can create noise. This is a good strategy to use when you know you’re staying around for a while, you have a lot of furniture to use as barricades, and your group contains particularly skilled barricade builders to build faster and better quality barricades. A well barricaded place can last a long time, but it’ll gradually wear down.
Support strategies
These strategies all have important, but indirect benefits.
Make the most of what you have
Modify, modify, modify. Tweak that shotgun. Augment that drill. Make a better saucepan. Run out of items to modify? Send your burliest survivors out to get some more while your engineer keeps cranking out better gear.
Modified items not only makes your survivors more effective at tasks and combat, it has a multiplier effect: making better tools helps you make better tools. And importantly, anything that makes jobs easier makes your survivor relationships stronger.
Best friends forever.
Survivor relationships have a significant effect on just about everything in the game. Any strategy should consider relationship dynamics (see Relationships section), but if you really want to focus on good relationships, here are some tips:
- Specifically put two survivors together on a task, even if the task is not strictly necessary
don’t be too quick to assign everyone to work – idle survivors may choose to socialise - Split the group into two safehouses, keeping prejudiced survivors apart
prioritise survivor relationships when responding to dilemmas. - Prepare large meals so you can hold a feast. Feasts boost all survivor relationships to maximum.
- Start a rumour about one of your survivors. Be careful: rumours aren’t unlimited and they may have unintended effects.
Example scenario
You decide to hole up in the bank, but banks aren’t known to hold food and medical supplies. You look at your survivors: relationships are poor and you don’t have any flashlights, so searching the store might take longer than expected, increasing the chance of attack.
You have a pilot and a police officer, so you employ a look but don’t touch style strategy and get the pilot to spot and police officer to patrol. It’s quiet and won’t attract zombies — but if they do attack then you’ll be prepared.
You’re nearly finished searching but a mob is starting to gather. If they burst in then things could go bad. Fortunately, you just found a rifle so you switch to thin the ranks by setting the pilot to snipe and the police officer to patrol and engage. This is noisy and risky, but it might just buy you enough time to finish scavenging supplies and run to the bank.
You arrive at the bank, but barricading might be a problem: you don’t have anyone particularly skilled at it. Worse still, your survivors aren’t getting along at all. You switch to a best friends forever strategy to improve their relationships, making sure you have spotters.
Meanwhile, you still need to work out how to secure the bank. You have an engineer who can modify tools, but no tools; you have a police officer and burly bartender who can probably handle themselves in a fight. You switch to make the most of what you have and send the officer and bartender out to scavenge tools from the factory next door.
A note on relationships
Relationships are one of the most important aspects of the game because they affect just about everything — dilemmas, combat, performing tasks are all influenced by the quality of relationships.
Despite this complexity, the rules that govern relationships are simple:
- Relationships can strengthen or weaken
- When something good happens, such as discovering a Rescue Item, beating back a horde of zombies, or just cooking a meal quickly and efficiently, relationships between affected survivors increase.
- When something overtly negative happens, such as someone dying, or a dilemma forces a tough decision, relationships are weakened.
- If a prejudice exists between survivors, the magnitude of a negative relationship change increases.
- When relationships are very bad, survivors might spontaneously argue and fight, which can have disastrous effects on their health, the environment or the mood of the group.
- When survivors are getting along very well then positive interactions can occur. They might swap strategies, start an ad-hoc combat training session, or just be so infectiously comfortable with each other that their harmony rubs off on everyone else.
But survivors aren’t your puppets. They won’t like each other just because you’ve told them to. All you can do is create an environment that enables positive interactions to occur and minimises negative interactions.
How do you do that?
- Relationships can be improved by putting skilled survivors on tasks.
- Break negative feedback loops. if survivors have a bad relationship, then they’ll perform worse, meaning the relationship will suffer more, meaning they’ll perform even worse than before, and so on.
- If a survivor is rubbish at a task, then improved tools can help give them a positive experience, as can combining a very poor survivor with very skilled ones.
- Start a rumour, but careful: they can backfire.
When things are going bad for the group, don’t add them to the same task; if things are extremely bad, split the group into different safehouses. Very negative relationships gradually improve between survivors if they are not at the same location. - Give them some space. Pull everyone off tasks for a while and give them a chance to socialise, have a drink, or maybe even prepare a feast.
- Always remember: even the happiest group can come undone if a zombie slips in through the bathroom window, corners a survivor on the toilet and tears him to shreds.
Customising your game
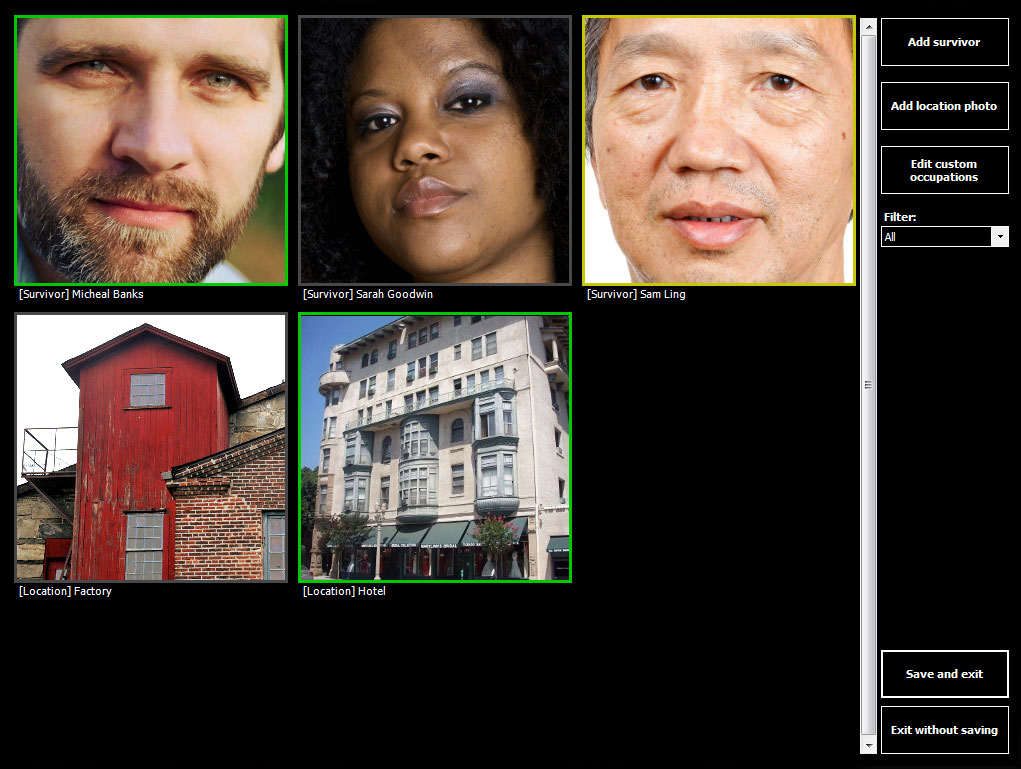
You can easily add your own survivor and location photos to your games. Just go to the Custom Content Manager from the main menu, click Add Survivor or Add Location, crop your image, enter some details, and you’re done.
Clicking the images will toggle between three states, signified by a coloured border: green, yellow and none. Green signifies the asset will definitely be included in your next game; yellow signifies that it will be added to a random ‘pool’ to draw from; no border means the asset will not be included in the next game. These options can also be set by right-clicking on an image.
Right-click on each image to add your survivors or locations to the random ‘pool’. To guarantee that your next game will include them.
Don’t worry about the quality of your images – Zafehouse: Diaries uses special filters to ensure your images will fit the game’s visual style.
Ancestries
Every survivor has an ancestry, which is used to determine prejudices among survivors. Internally, the game does not mention any specific ancestries by name – they are just considered ‘groups’ of individuals.
You can group your survivors into any ancestry that makes sense to you by just selecting one of the 6 ancestry labels. We leave these up to you so you can make your own ancestry groups, depending on how you want to customise the game, and what ‘ancestry’ might mean to you.
Note: internally, the game uses ancestries to group survivor photographs, so if you want to mix custom survivors with the built-in survivors, here’s how you should tag your survivors:
Ancestry 1: African
Ancestry 2: Central and South Asian
Ancestry 3: East Asian
Ancestry 4: European
Ancestry 5: Middle Eastern
Ancestry 6: Native American
Editing your diary
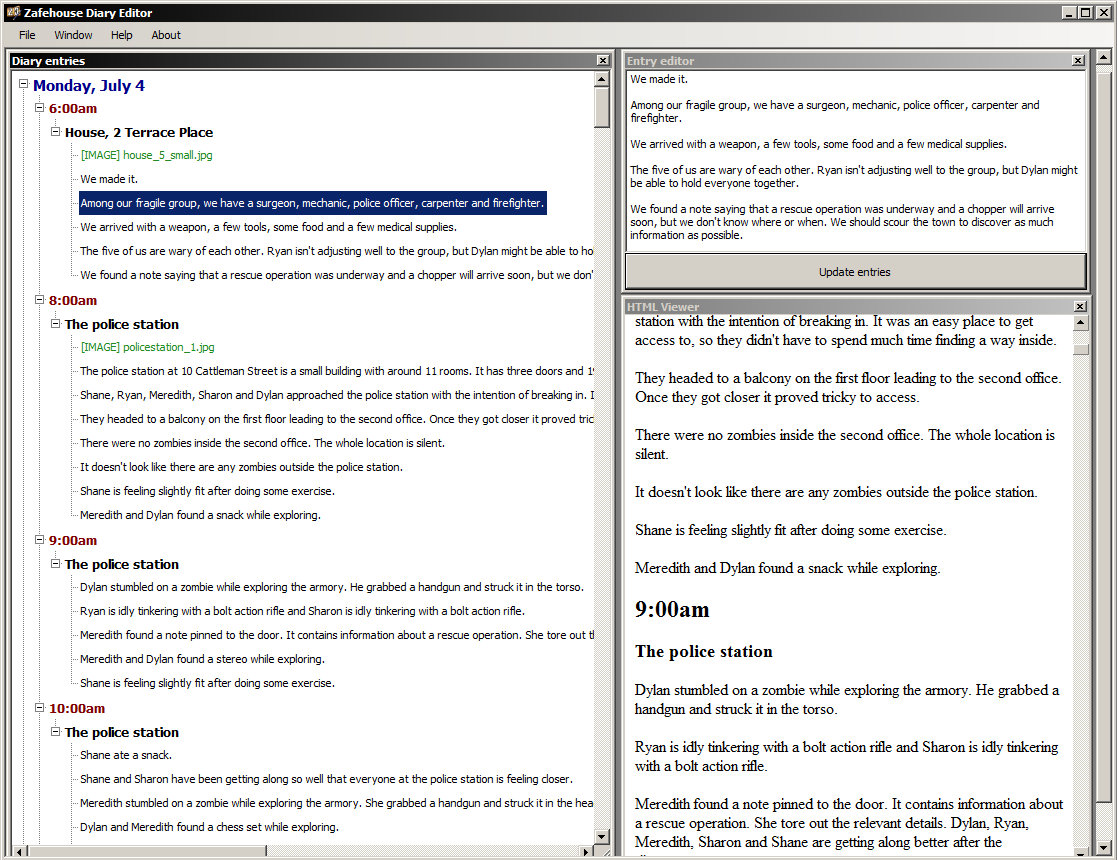
Zafehouse: Diaries includes a free diary editor. It has three main windows:
- Diary entries: a list of all entries, segmented by day, time and location
- Entry editor: a window that lets you freely edit all entries at a location for a given time slot. Any new entries (designated by a paragraph break) will be added to the location entry for that time.
- HTML view: this renders your diary as a simplified HTML document. Right-clicking lets you examine the source code and/or copy the text.
FOLLOWING FEATURES COMING SOON:
Make changes to your diary by deleting ‘noise’ and performing complex string replacements. Diary noise is the inevitable result of repetitious phrases that are helpful when playing the game, but are not interesting to read once the game is over. This will include several options:
- Find and replace: this works in a similar fashion to a word processor – just type in the word or sentence you want to find, and then enter its replacement.
- Regular expressions: similar to the above, but supports regular expressions. Zafehouse: Diaries outputs formatted statements that are easy to parse, so regular expressions are a good fit.
- Subeditor: this is a built-in set of deletions that removes the most common types of noise.
Publishing your diary
Once you’ve edited your diary, you can upload it to our free online repository. Your diary will be automatically rendered in HTML and publicly viewable by anyone with the link.
To upload a diary, click ‘Share your story’ from the toolbar at the bottom and enter your account details. If you don’t have an account, you can register for free, which also gives you access to our forums.